Sculpt · Model · Texture · Render · Export
Everything Mixos can do.
54 capabilities across 5 apps that share one library and one document, so a model moves between them without losing its texture. Every one of them runs in a browser tab, on the machine you already have.
Stage one
Model and assemble
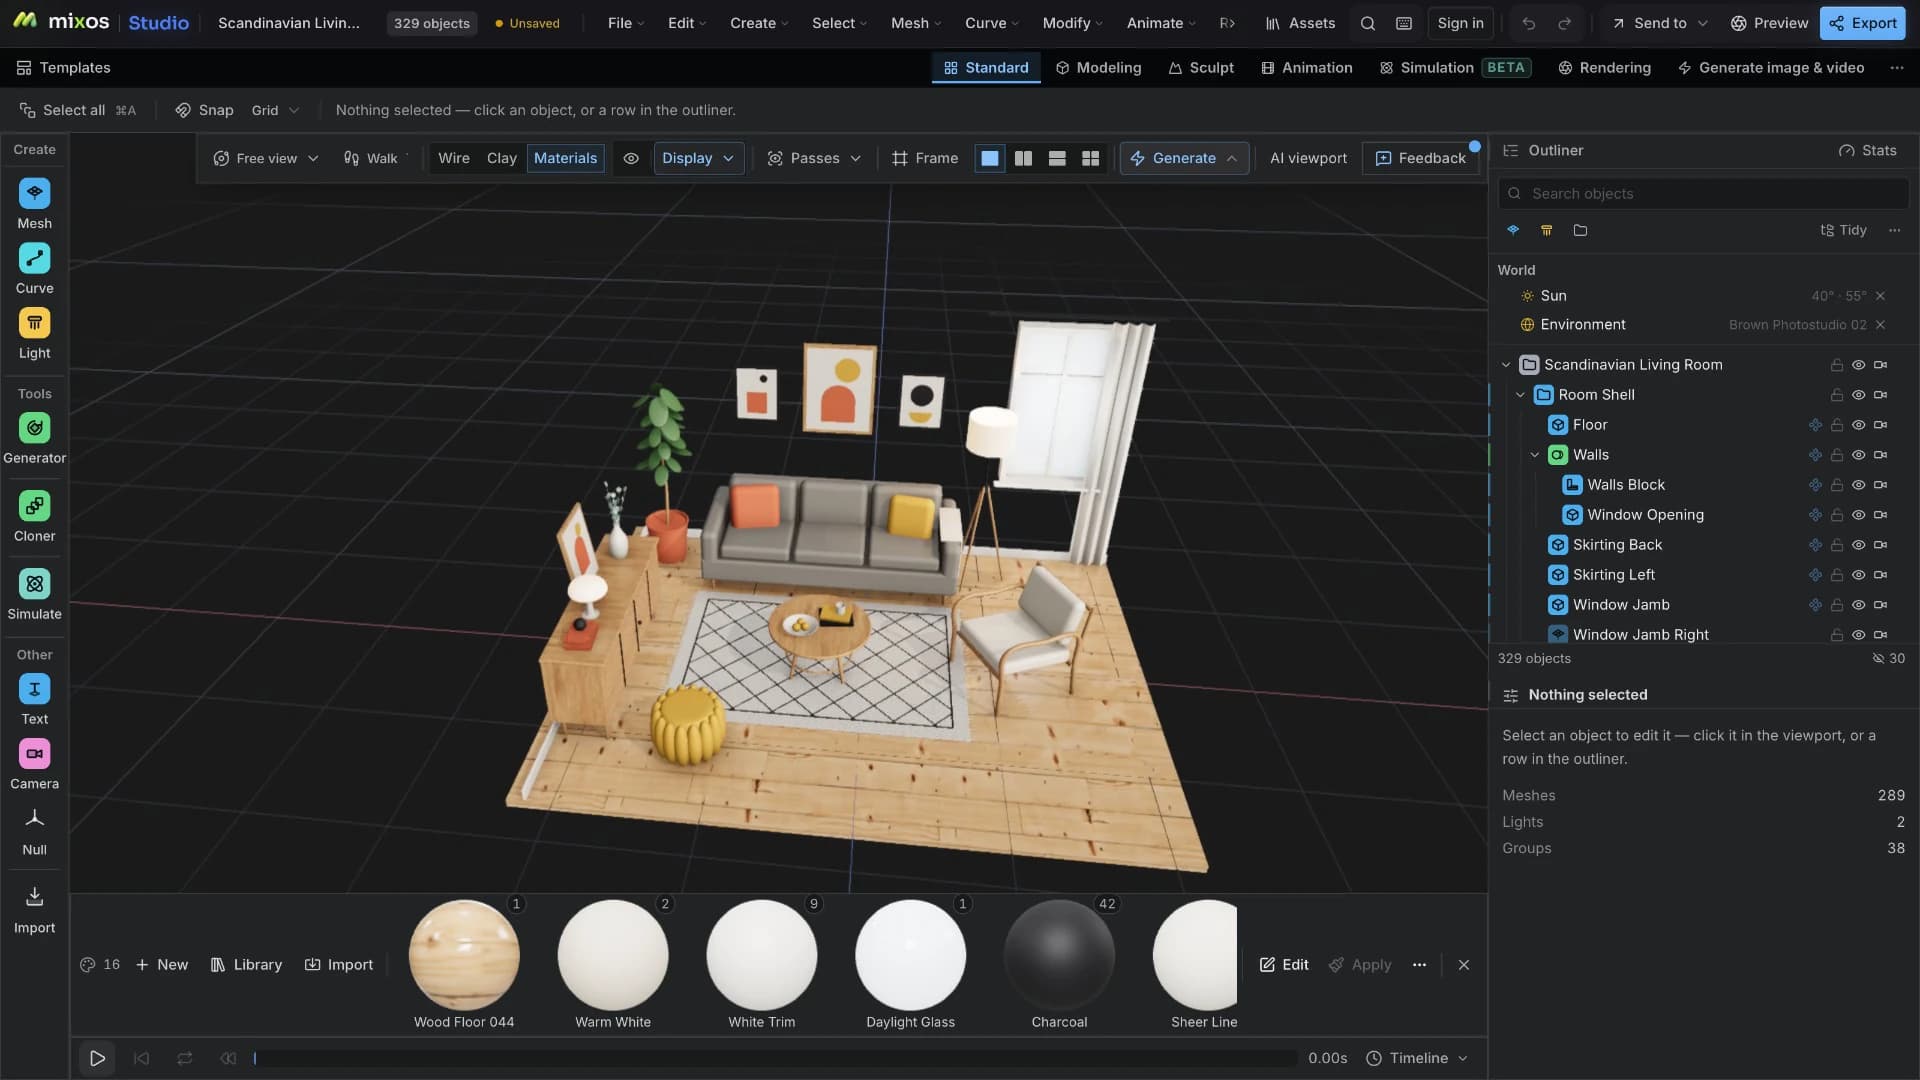
Build the geometry and arrange the shot. Studio is the workspace; everything here is verified against the scene graph, the half-edge modeling core and the modifier stack.
A real scene graph
Parent objects into a hierarchy and transform them as one. Groups, nulls, lights and cameras are rows in an outliner you can search, filter, reorder and drag.
Polygon modeling
Extrude, inset, bevel, loop cut, subdivide, bridge, poke, dissolve, boolean and merge, on a half-edge core that rebuilds and validates the mesh rather than mutating it.
Non-destructive modifiers
A stack you can reorder, disable or delete at any point, with the original mesh untouched underneath.
Curves, splines and generators
Draw a path with the pen tool and drive geometry along it — sweeps, lathes and extrusions that stay editable as curves.
Cloners and effectors
Distribute copies across a grid, radius or curve and push them around with falloff effectors, without duplicating a single object by hand.
3D text with real fonts and bevels
Set type as geometry, in a font you choose, with a bevelled profile — not a texture of some letters.
UV unwrapping and an island editor
Cut seams, unwrap, and lay islands out on the sheet — with a dedicated UV workspace rather than an export to a second tool.
Stage two
Sculpt
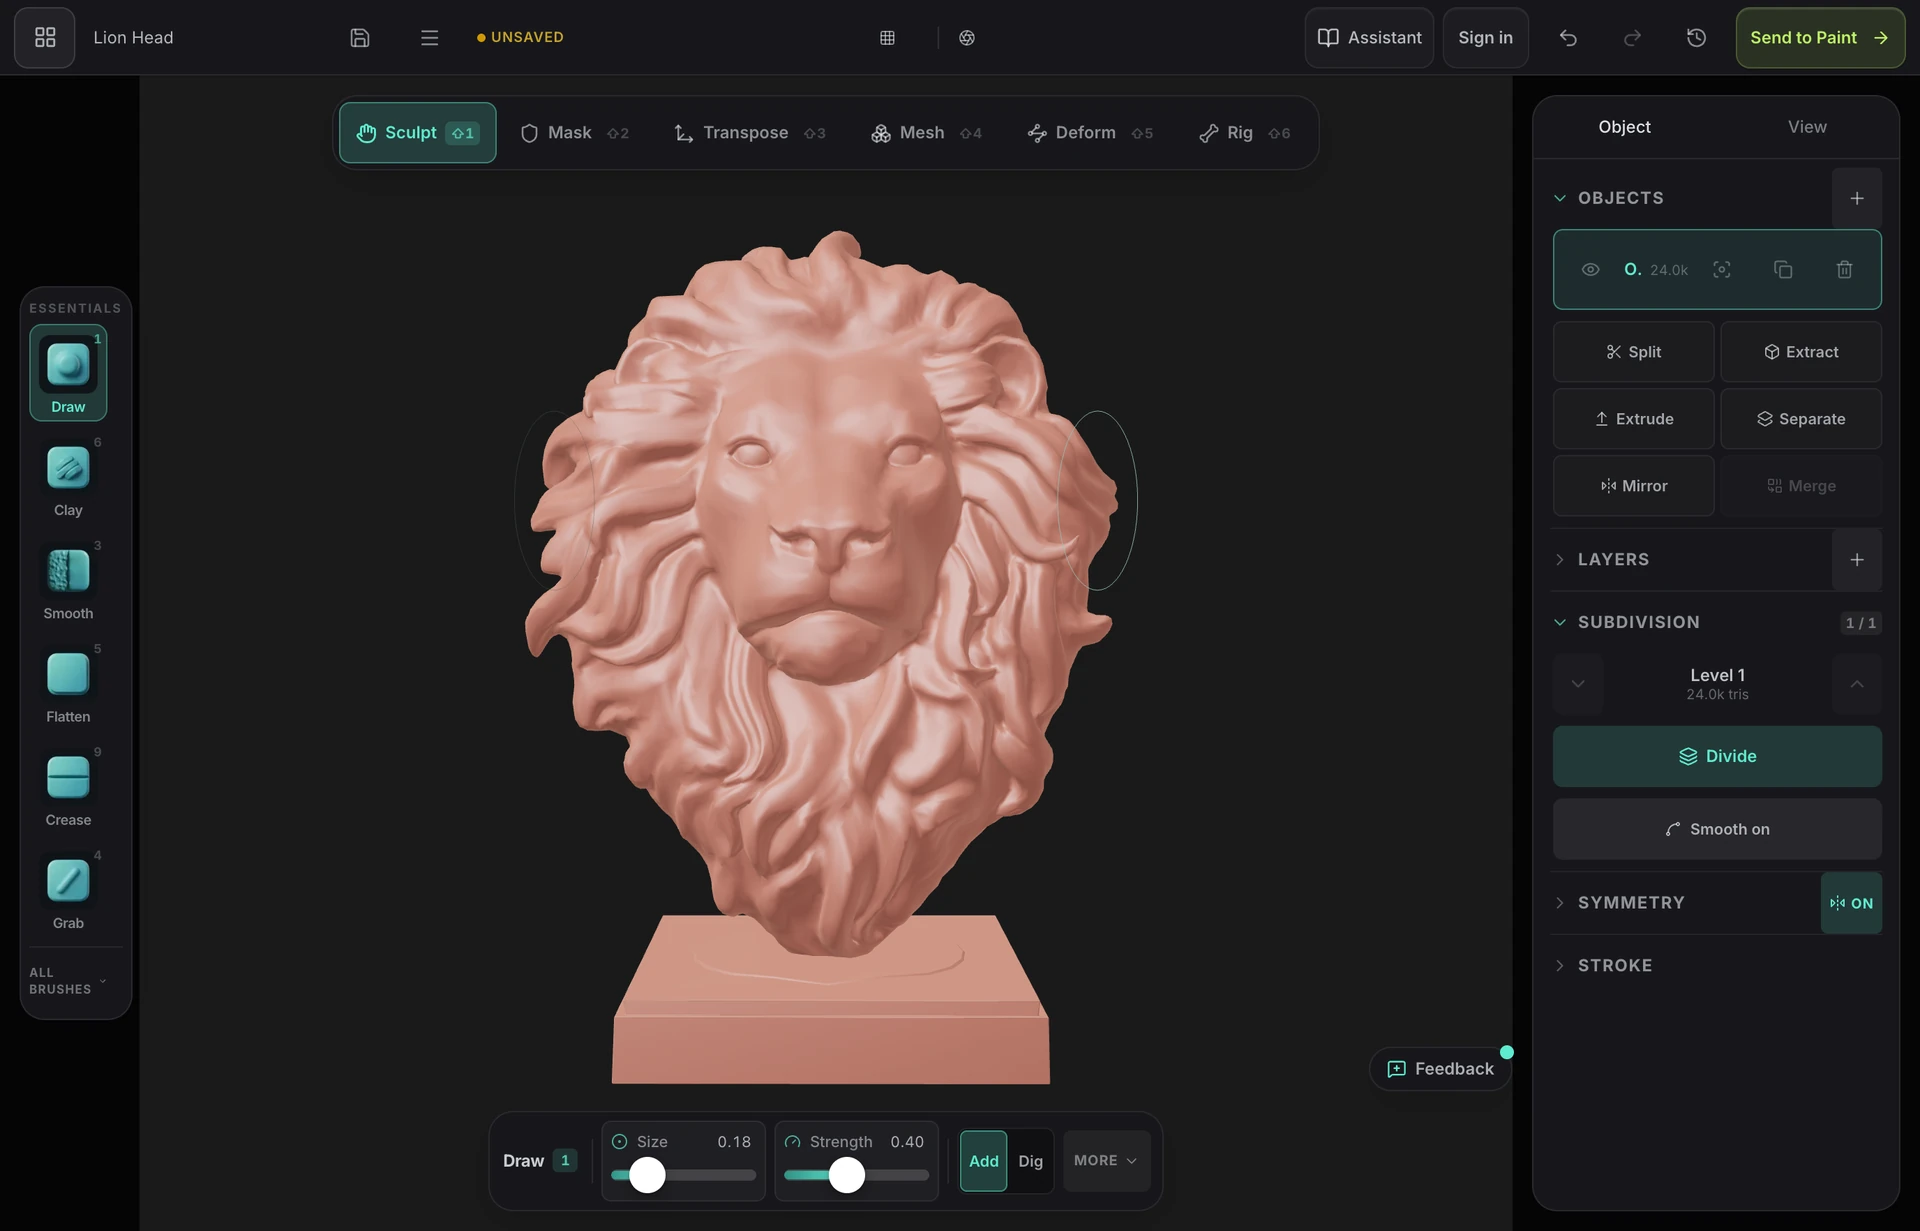
Push organic form around on the GPU. Mold's engine displaces vertices on the same WebGPU device that draws the viewport, which is what keeps strokes responsive on dense meshes.
Pressure brushes
Draw, inflate, grab, flatten, pinch and crease with falloff, pressure and tilt — Apple Pencil and Wacom included.
Multiresolution subdivision
Take a base mesh into millions of triangles. Sculpt broad form low, step up to carve detail, and move between levels freely.
Dynamic topology
The mesh tessellates under the brush as you pull new form out of it, so resolution appears only where you are actually working.
Voxel and quad remesh
Rebuild a clean, evenly-tessellated surface when the topology stops cooperating — and a watertight one when the target is a slicer.
Stamp alphas and brush presets
Press detail in rather than carving it: stamp alphas for skin pores, scales, bark, leather, rivets and knits, plus named presets so a favorite setup is one click.
Masking and symmetry
Mask regions to hold them still, and mirror strokes across an axis or radially.
Reshape without losing the paint
Sculpt the base again after texturing and the model rebinds to the same UV atlas — the painted layers are never resampled, so the loop runs both ways.
Stage three
Texture and paint
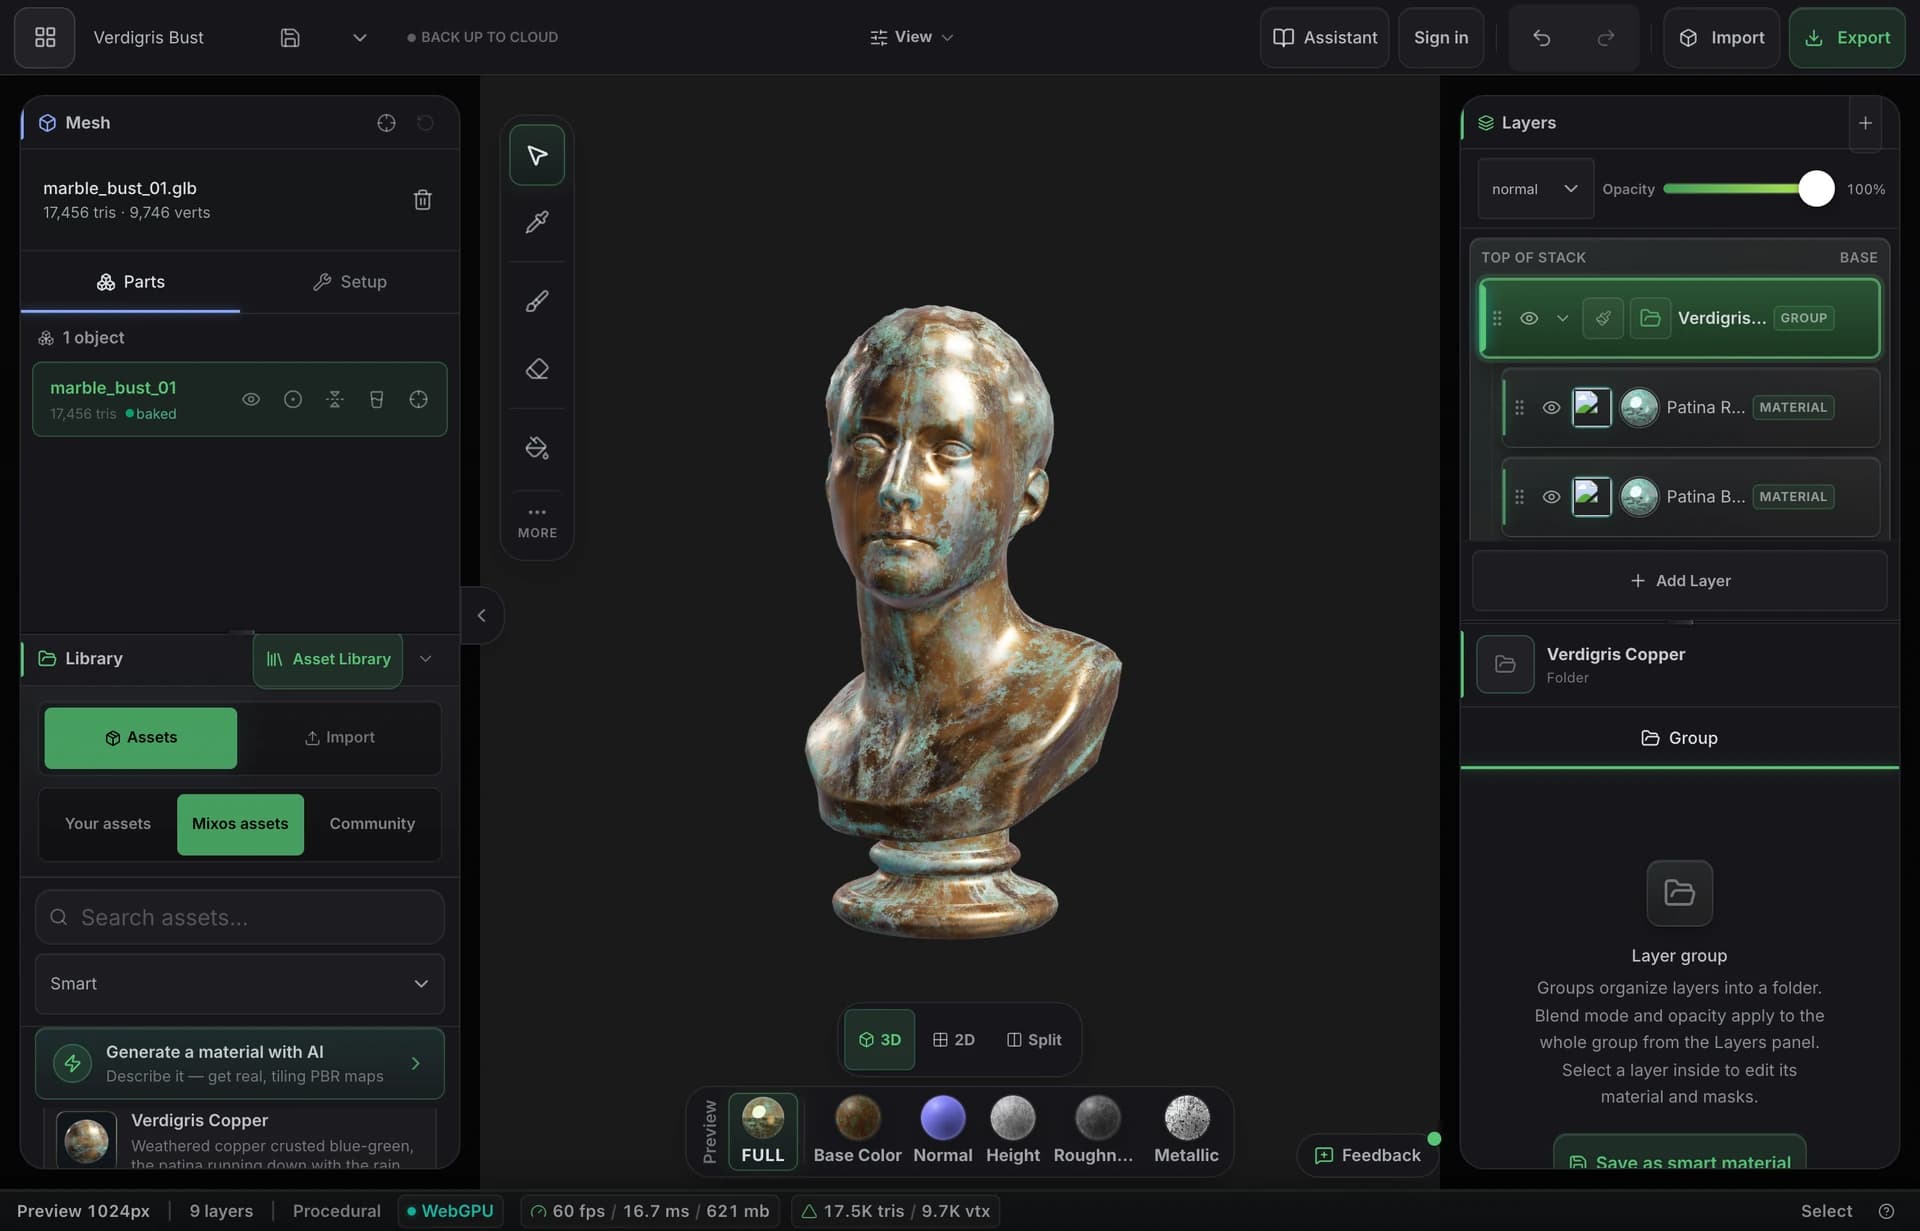
Paint is the layered PBR texture painter, and Auto feeds it. Everything here writes real map channels, not a flat picture baked into base color.
Paint straight onto the mesh
Brush modes, alpha stamps and projection painting that carries across UV seams — for the texture and for the masks that place it.
Non-destructive layers
Blend modes, opacity and per-channel toggles. Paint color, height, roughness and metallic independently, and switch any layer off at any point.
Paint in 2D and 3D at once
Split the view and work on the flat texture sheet beside the model — same brushes, same layers, both panes updating together.
Smart masks from the geometry
Edge wear, curvature, grime and cavity masks generated from the mesh itself, with amount, edge size, contrast and chipping as sliders.
Node-graph materials
Build a surface out of a graph when sliders run out, and reuse it across objects.
Decals and stencils
Place logos, warnings and stencils with an on-mesh gizmo — against the geometry, not against a flat UV sheet.
Selection tools
Constrain painting to a region rather than relying on a steady hand.
Height-blended tiling surfaces
Stack PBR materials and let height decide which one shows through — gravel settling into mortar rather than a soft cross-fade.
Procedural masks, no mesh required
Author a tileable surface on a plane or sphere with no model, no UVs and no setup, then hand the stack to Paint.
2600+ ready-made PBR materials
A CC0 library of metal, wood, stone, fabric and leather built in, plus 376 free models — drag one on and tune tiling and roughness.
A material shelf that keeps growing
Seamless PBR sets generated in Mixos with AI and published by the artists who made them land in the same library every week, behind their own Community filter.
Stage four
Light and render
The part of the suite that was hardest to find and is furthest along. The viewport path-traces the scene exactly as assembled — same lamps, same materials, same world.
Point, spot, directional and area lamps
Area lights in rectangular or disc form, with textures, and physical units that agree between the viewport preview and the final trace.
IES photometric profiles
Load a real IES file and get the manufacturer's actual light distribution, not an approximation of a cone.
Mesh emitters
Turn any surface into a light source — a strip, a screen, a neon shape — and have it emit into the trace.
Volumetric fog
A participating medium the light actually scatters through, for shafts and haze that respond to the lamps rather than being painted on.
HDRI environment and world
Image-based lighting and a background that are rows in the outliner rather than settings buried in a dialog.
Path-traced stills at full resolution
Re-accumulate a still from scratch at your output size and sample count, with a denoiser so a usable frame lands well before the count finishes.
Cameras you compose through
Real camera settings and frame guides, and a fast rasterized render when you want a full-resolution frame in under a second.
Stage five
Rig a character
Turn a static humanoid into something posable and animatable — verified against the rig command set, the humanoid fitter and the skin solver.
Auto-rig from a T-pose
Fit a 21-joint humanoid skeleton to an unrigged character and solve its skin weights in one step. Joint heights, arm span, shoulder width, crotch and ankles are measured off the mesh rather than assumed from a template.
Skinning that survives an assembled character
Weights solve through a volume field rather than across the triangle surface, so a character built from separate pieces — body, armor, hair, accessories — binds as one rather than tearing at the seams between them.
IK controls for posing
One command reads a humanoid skeleton and builds hand and foot targets, elbow and knee poles and a head look-at, grouped on the character. Nothing moves when it runs; afterwards, posing is dragging a control.
Bake IK to keyframes
Sample the solved chains across a clip into ordinary rotation keys — what an exporter reads, and what you hand-edit when the solve is close but not right.
A motion-capture library of 2500+ takes
Search the CMU motion-capture corpus by category, preview a clip running on your own character before committing it, and retarget it onto that character's proportions. Skeletons are matched by shape, so a rig whose bones are named in nobody's convention still maps.
Stage six
Animate
Keyframes, curves and rigs on a timeline that nests the hierarchy — verified against the animation track model, the clip importer and the frame-sequence writer.
Keyframe animation
Key transforms and parameters on a timeline, retime in the dopesheet, and shape interpolation in a curve editor with real tangents.
Clips and drivers
Keep separate takes apart as clips, and link one value to another for the relationships a keyframe cannot express.
Rigged and animated import
Drop in a Mixamo FBX or a GLB carrying clips and the skeleton decomposes into outliner rows with its animation on the timeline as ordinary editable tracks — bones are scene objects, retimed and re-curved like anything else.
Constraints
Aim, parent and follow relationships that hold as the scene moves, rather than being re-keyed by hand.
Render an animation out
Finished animation exports inside a GLB, or renders as a path-traced numbered frame sequence.
Anywhere in the pipeline
Generate with AI
Seven generators, and the thing that separates them from an image tool: every one returns something editable — real map channels, real geometry, a real layer in the stack.
Materials from a prompt
A full PBR set — base color, normal, roughness, metallic, height — added to the stack as a new layer.
3D models from a prompt
A textured mesh with real UVs that replaces the model in your viewport and saves to your library — geometry you can then sculpt and paint.
Texture a whole model in one pass
Describe a look and Auto projects it over the real geometry from every angle, returning editable PBR maps and a textured GLB.
Weathering masks, brush tips and decals
Generate the small assets a texture job actually runs out of, straight into your masks, brushes and decals.
Restyle a layer you already have
Rework an existing layer's texture from a description and get the result as a new layer, with the original intact.
Finish a framed shot
Generate repaints the frame inside your guides as a photograph, at the size and position you composed, with a dial for how literally the geometry is held.
Stage seven
Export and interoperate
Where the work leaves. Exporting is the commercial boundary — everything up to it is free on every account, and the formats below are what the export paths actually write.
Standard PBR map sets
Base color, normal, roughness, metallic, height, ambient occlusion, emissive and opacity, named for the engine you are handing them to, up to 4K.
Channel packing
Pack ORM and other channel combinations on the way out, so the maps arrive in the layout your target expects.
Models and scenes
GLB, glTF as a zip, or USDZ for Apple Quick Look. Whole scenes as a self-contained HTML page, a CMS embed snippet, a react-three-fiber component or a vanilla three.js module.
STL for 3D printing
Export the sculpt as STL, OBJ or GLB — with a voxel remesh that produces the watertight mesh a slicer wants.
Live Link to Blender, Cinema 4D and Unreal
Paint in the browser and watch the texture update on the model inside your DCC, without an export round trip.
Cloud library on every device
Save once and the project syncs to your account — start on a tablet, finish at a desk, and open it on any machine you sign in to.
The suite
5 apps, one document.
Studio
Scene assembly, modeling & animationAssemble a shot: a real scene graph with parenting and transforms, polygon modeling on a half-edge core, and keyframe animation on a timeline — with an assistant that can drive all of it.
Paint
3D texture paintingImport a mesh and paint, layer, and mask production PBR materials right on it — then export clean map sets for any engine.
Auto
AI auto-textureDescribe a look in one prompt and Auto textures your whole model — editable PBR maps and a textured GLB, projected onto the real geometry.
Mold
3D sculptingSculpt organic form directly on the GPU — subdivide, push, pull, and smooth clay with pressure brushes, then hand the mesh to Paint to texture.
Logo
AI 3D logo designTurn a flat mark — yours or one described to an AI — into a stack of real extruded 3D layers, then give it metal, glass or neon, light it, and render a still or a turntable.
All of them run on iPhone and iPad.
Every app above ships inside the free Mixos app, with a touch and Apple Pencil layout — and the browser still needs nothing installed. iOS 26 or later.
Open a tab. Start creating.
Everything above is free to use. A paid plan is what takes the files out — so you can carry a project from empty to finished before deciding whether to subscribe.